
Saturday, February 18, 2012
Friday, February 17, 2012
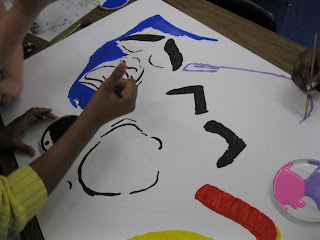
Recycled Bottle Top Mosaics


This lesson was taught to my "art enrichment" students. It is comprised of only 3rd, 4th, and 5th graders. We discussed what the different types of "fine arts" included. Then we talked about what the word "advocate" meant. We talked about the importance of spreading the word of how important the arts are!

To start, students looked at examples of drama faces, paint pallettes, and guitars and music notes. Then, they sketched out their own versions of the images onto large scale foam boards. Next, the painted the images in with acrylic paint. After that, they laid out bottle caps on top of the paint; making sure to coordinate alike colors. Finally, we glued each bottle cap down to complete our recycled mosaics!


Thursday, February 16, 2012
Still Life Flowers


We also learned about the artistic technique of drawing and painting a still life. A still life is when make a drawing based on a gathering of inanimate objects in the middle of a table; like a vase of flowers or bowl of fruit. Many famous artists started with still life art before going on to more complicated artforms. It is a great tool to gain more artistic skill.
We also learned the difference between cool colors (blues, purples, and greens) and warm colors (reds, oranges, and yellows). You can see these represented in van Gogh's flowers (pictured above).
This was the first lesson we did where the students did their artwork on the tar paper. I loved the way they turned out. They started with a chalk outline and filled it in with oil pastel.

Once the artwork was complete, I put a thin coat of acrylic varnish on top. When it dries the chalk outlines dissapear; leaving a lot of great contrast. The dissapearing chalk reveals the black of the paper underneath.


Wednesday, February 1, 2012
Recycled Crayons

All you have to do is:

- Collect some silicone ice trays (I got all of mine at the dollar tree)
- Remove all paper wrappers from crayons (this part is tedious and boring)
- Break crayons into small, manageable pieces that will easily fit into the trays
- Fill the trays to the top with crayon pieces, be creative...mix the colors up!
- Place in a 200 degree oven
- Check to see if they are all melted in about 5-10 minutes
- Carefuly remove trays from oven, set aside to let crayons cool down (I had a little fun creating a marble effect in the hot crayons with a toothpick!)
- After about 15 mninutes, pop crayons out of trays (don't wait to long because they will be too hard to get out)
- COLOR!

Subscribe to:
Posts (Atom)