Showing posts with label 5th grade. Show all posts

Friday, February 17, 2012

Recycled Bottle Top Mosaics

How cool are these?!!?!  I have been patiently waiting to do this project for over a year now.  I hadn't had enough soda, juice, and water bottle tops turned in until recently.  I have asked parents and students to collect them and turn them in.  I have been collecting them like a mad woman in my own kitchen as well. After I get them turned in, I organize them based on color into different boxes.

This lesson was taught to my "art enrichment" students.  It is comprised of only 3rd, 4th, and 5th graders.  We discussed what the different types of "fine arts" included.  Then we talked about what the word "advocate" meant.  We talked about the importance of spreading the word of how important the arts are!

 
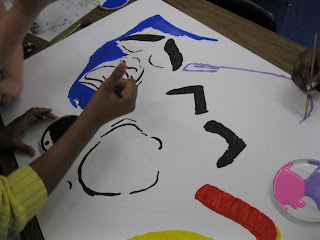
 To start, students looked at examples of drama faces, paint pallettes, and guitars and music notes.  Then, they sketched out their own versions of the images onto large scale foam boards.  Next, the painted the images in with acrylic paint.  After that, they laid out bottle caps on top of the paint; making sure to coordinate alike colors.  Finally, we glued each bottle cap down to complete our recycled mosaics!


Wednesday, November 16, 2011

Owl Moon

My 3rd, 4th, and 5th graders have been working on our "Owl Moon" project for a couple of weeks now.  In case you didn't know, I persnoally adore owls.  They are my favorite animal (besides my pup Luna) and I have been collecting them in the form of jewelry, figurines, art, and anything really for years now.

In this art lesson, we read the book "Owl Moon" by Jane Yolen and assembled our own artwork of an owl on a branch with a moon in the background.

We learned about owls, their habitats, their feather colors, and the food they eat. We also learned that most, but not all, owls are nocturnal (meaning they sleep during the day and hunt and stay out during the night).  We also learned that owls can turn their heads all the way around and look behind them.  We learned that their feathers are natural colors like browns, grays, white, and blacks so that they can blend in like camouflauge.  This is so they can hide from their prey and their preditors.  We learned about barn owls, snowy owls, the great horned owl, and the burrowing owl.  Did you know that most owls don't even make their own nests?  Instead they wait for other birds to move on and they repurpose the nests for their own needs.

Here are some finished art pieces from my students.  First, they cut out a branch and glued it on the bottom of their paper.  Then they drew an owl on another piece of construction paper.  They colored in their owls with neutral colored oil pastels and added details in the form of lines, shapes, and patterns.  Next, they cut out their owls and glued them onto the branch.  To finish, they drew a moon up top!

Sunday, October 30, 2011

Matryoshkas

Matryoshkas are Russian nesting dolls.  We learned about Russias culture during this art lesson.  We looked at images of St. Basil's Cathedral and discussed the difference between fantasy and realism. 

We also talked about how symmetry is shown in artwork if you can draw a line down the middle and have both sides equal.  Students also drew their matryoshkas in descending size order (from big to small) to demonstrate the art concepts of proportion and scale.  Students also learned how to draw proper facial features.

Some students in 4th and 5th grade got the opportunity to write a letter to a pen pal in Russia.  I will be sending those letters to an English speaking school in Moscow soon and we hope to get some back!

Sunday, September 18, 2011

Inuit Line Animals

In this art lesson, we learned about the Inuit people of Alaska and Canada.  We discussed their lifestlye and the climate of the areas the live in.  We also discussed the importance of animals within their culture.

Next, we looked at examples of various lines.  We discusses the meaning of the art element line.

For the lesson, students were shown (step by step) to draw an animal.  They had to pick either an owl, a fish, or a cat.  To complete their artwork, they filled their animals with many different lines.  I love how this project turned out!  So detailed and vivid!


Friday, September 2, 2011

Illuminated Manuscripts

In this art lesson, students learned about the Illuminated manuscripts that existed across many cultures (including Irish, Roman, Islamic, etc.) beginning around 400 AD.  We looked at examples of some illuminated manuscripts like the ones below.  Typically, illuminated manuscripts refered to books that had elaborate illustrations throughout.  They also usually incorporated silver or gold painted text in the form of enlarging the first letter at the beginning of a chapter.  This is similar to classic nursery rhyme books too.


For the art lesson, students painted the first letter of their first name a metallic color.  Then they glued it to the middle of the paper and added a frame around it.  They completed the artwork by drawing lines, floral motifs, shapes, and patterns around the letters.  Here are some examples from my students' completed artwork.

Thursday, May 12, 2011

Mixed Media Windows


One of the main mediums I create my own art in is mixed media reverse painting and collage on old windows.  My best friend's dad had all of the windows in his house replaced and gave me some 30 plus windows.  My studio at home could not handle such a large quantity and I immediately thought about doing a lesson with my older students with the windows.

I also connected it to behavior and effort.  At the beginning of the school year, I showed my students examples of my window art and the blank windows I had brought to school.  I informed them that if they worked hard on their art throughout the year and had good behavior as a class, that we would create a collaborative artwork on a window in the Spring.

I collected old education books and maps from the thrift stores and let them cut out images that they liked to collage onto the back.  Then the classes brainstormed on shapes, and each class voted on one shape to use to create a repetition on their window.  They drew them on with sharpe markers.  Finally, they finished the windows by painting them.

Wednesday, March 23, 2011

Faith Ringgold's Flag Story Quilts

Faith Ringgold is a famous African-American, female artist who grew up in Harlem, New York.  Her artwork is inspired both by her memories of helping her mother sew and craft as well as her experiences with painting in college.  Faith Ringgold combines sewing, painting, and text to create beautiful "Story Quilts."  One of her artworks, titles "Flag Story Quilt," combines vivd textiles in red, with newspaper clippings to create an abstract version of the American flag.  Here is Faith Ringgold's "Flag Story Quilt."

In this lesson, students created their very own flag story quilt by building a flag collage.  Students cut out paper from magazines, patterned paper, and plain paper.  They glued down their stripes to create the basic flag design and finished of their flags by adding abstract shapes to represent the stars.  Here is a student example of the flag story quilt:

Wednesday, March 9, 2011

Chinese Scroll Paintings

During the second semester of the school year, I have the great pleasure of teaching an art enrichment course.  This class consists of hand-selected students from 3rd, 4th, and 5th grades.  Students are chosen to participate in the class based on positive behavior and artistic skill.  The class is a real joy to teach, because with smaller nubmers and smaller classroom management issues, we can really have fun making art.  I also get to interact one-on-one with the students a lot, which is amazing!


For our first project, we learned about Chinese scroll paintings.  Students started by drawing a vertical composition (most popular designs included floral motifs such as a cherry blossom tree, landscape designs including mountains and rivers, and bamboo plants sweeping across the page in intense diagonals).  After students drew their pictures, they filled them in with watercolors (using wet and dry brush techniques).  Next, they picked Chinese characters symbolizing words that they thought suited their picture and drew them in the upper corner.  Each student "signed" their piece using a unique red stamp seal they created on their own by carving into styrofoam with a pencil.  Finally, they added a black bar on top and bottom to complete the scroll!  Aren't they beautiful?

Wednesday, February 16, 2011

Lascaux Cave Drawings


For this lesson, I showed students a video that was captured of the cave drawings inside Lascaux Caves in Lascaux France.  The video was made in the 1960's so that the public could still see Lascaux's beautiful prehistoric images even though the cave was closed off to the public (in order to preserve the art).

The cave drawings are believed to date back over 17,000 years; making them the oldest art known about in the entire world!  The story goes that 4 teenage boys discovered the cave in 1940 when they noticed a hole in the ground where a tree once stood.  A lightning storm had struck the tree, revealing the hidden cave underneath.  Imagine how special you might feel if you were one of the 4 lucky boys who discovered the oldest art in the world!

In this art lesson, students were instructed to draw at least 2 animals (like those seen at Lascaux: cows, bulls, deer, bears, or a unicorn) and at least 3 symbols.  After students designed the composition of their drawing on a practice sheet, they completed a final drawing and added color with oil pastels.  We used a manilla paper to mimic the look of the ancient cave.

Tuesday, December 14, 2010

Winter Tree Silhouettes

In the spirit of the season, I let my 3rd, 4th, and 5th graders paint a "winter tree silhouettes."  We live in Alabama, and rarely get snow, so the kids get quite excited about even mentioning it!


This project was really quick and easy (most kids finished it in one 30 minute class period).  First, they drew a tree silhouette and filled it in with black crayon.  Afterwards, they painted snow on the ground with white tempera paint and added some to their branches and some falling.

Monday, December 6, 2010

"Dia de los Muertos"

"Dia de los Muertos" is a very important Mexican holiday that is celebrated in Mexico and parts of the United States every year on November 2nd.  In Engllish, "Dia de los Muertos" is translated to Day of the Dead.  During this day, people celebrate by remembering loved one that have passed away.  There are many traditional ways of celebrating; some of which include building altars in remembrance of loved ones, dressing up as skeletons, dancing, eating special foods (like Pan de Muerto), a procession or parade, a name call of the deceased, and decorating gravesites with flowers and marigolds.  Often, people will also tell stories retelling fond memories of loved ones lost. 

Another big activity is making sugar skulls and using them to decorate.  A sugar skull is a skull made out of sugar that is decorated with icing.  The sugar skull image has spread through the culture of "Dia de los Muertos" to include costumes, artwork, and more.  In this lesson, students drew a sugar skull with silver sharpe on black construcion paper to create a stark contrast of lights and darks.


Every year, I attend the Day of the Dead festival at Bare Hands art gallery in downtown Birmingham.  It is a fabulous event with food, drinks, dancing, costumes and loads of wonderful art!

Friday, December 3, 2010

Aboriginal Snakes

I also did an art lesson based on the Aboriginal people with my older students (3rd, 4th, and 5th grade).  One way Aboriginal people present animals in their artwork is through their "X-ray" style paintings.  This is where you can see details inside the body of the animal just as a doctor would see the details of your bones on an x-ray.  After students finished drawing their snake in oil pastel, they added Aboriginal symbols to the background to finish their composition.
Originally, I got this idea from Art Projects for Kids, but I changed it up a little by having my students add symbols to their background!

Wednesday, October 20, 2010

Mandalas


Last week in art, all of my students learned about the ancient Asian artform of creating mandalas.  Mandala actually means "circle" in Sanskrit (an ancient Indian written language).  However, mandalas are much more intricate and meaningful than that.  Mandalas are often used to focus attention and deliniate a sacred space. 

 After looking at many variations of mandalas, we talked about concentric circles and radial symmetry. 
Some Tibetan Buddhists create painstakingly detailed mandalas out of sand (like the one below).

I gave each student a 9 x 9 square piece of heavy weight watercolor paper (90 pound).  First students drew a large circle.  Then, they divided the circle into 4 equal quadrants.  Then, the students added identical lines and shapes in each of the four quadrants; therefore crearting a concentric circle filled with a radialy symmetrical pattern.  The results?  Well, see for yourself!


Wednesday, September 15, 2010

Optical Illusions

I decided to try and do an optical illusion art lesson with my older students (4th and 5th grades).  I found a lot of optical illusion images and built a flipchart for my Promethean board.  The kids got really excited about looking at all of the illusions.  We even talked about how the word optical is similar to the words Optometrest, Opthamologist, and Op (from Op Art).  We talked about how the prefix has to do with the eye and seeing.

After looking at all of the illusions on the board, I passed out 9 x 12 newsprint, plastic bowls to trace circles, pencils and rulers.  First, the students created a practice drawing.  This was very important because the concept of using a ruler to draw straight lines was a bit foreign to them and the level of difficulty on this project was fairly high.  I thought teaching them ruler skills was beneficial too, because that is a skill that they may be tested on in math.  This lesson was also a wonderful way to introduce basic perspective and the vocabulary associated with it.


First the students traced a circle anywhere on their paper using a bowl, then they made marks on two sides (one long and one short) of their paper every inch.  Next, they used the ruler to create a checker pattern in their background by drawing a line everywhere their one inch marks were.  After that, they turned their circle into a spherical form by placing vertical curved lines that all dissapear at the same vanishing point on top and bottom.  Then they repeated this for the horizontal lines.  Lastly, they colored in their image with two crayon colors of their choice!

The results were magnificent!